

How to Create a Filter on Gmail
Gmail filters are a powerful tool that allows you to manage your inbox efficiently by automating actions on incoming emails. With filters, you can automatically label, archive, delete, star, or forward emails based on specific criteria. Here’s a step-by-step guide on how to create a filter on Gmail.
Step 1: Open Gmail
- Go to Gmail and log in to your account.
Step 2: Access the Filter Settings
- In the search bar at the top of the Gmail interface, click the Show search options icon (a small downward arrow on the right side of the search bar).
Step 3: Define Your Filter Criteria
You will be presented with various fields to specify your filter criteria. You can filter emails based on:
- From: Sender’s email address.
- To: Recipient’s email address.
- Subject: Specific words in the subject line.
- Has the words: Specific keywords in the email body.
- Doesn’t have: Exclude emails with certain words.
- Size: Filter by email size.
- Attachments: Filter emails with attachments.
- Date within: Filter emails within a certain time frame.
After filling in the desired fields, click Create filter.
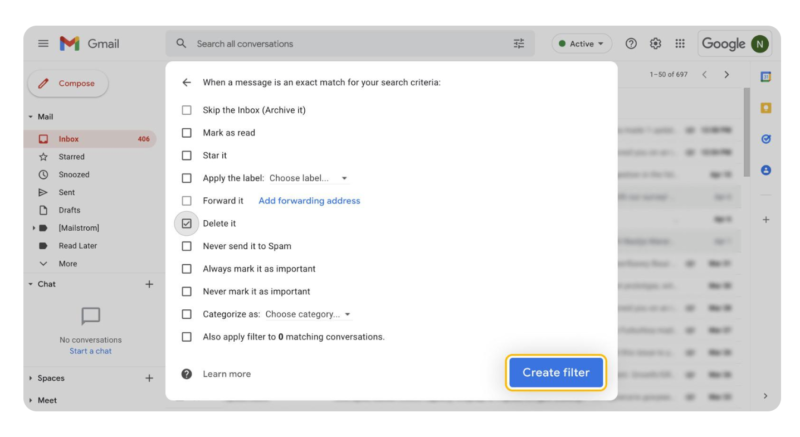
Step 4: Choose Filter Actions
Next, you’ll be presented with a list of actions you can apply to the filtered emails. Options include:
- Skip the Inbox (Archive it)
- Mark as read
- Star it
- Apply a label
- Forward it
- Delete it
- Never send it to Spam
- Always mark it as important
- Categorize as
Select the actions that suit your needs. For example, you can automatically apply a label to emails from a specific sender.
Step 5: Create the Filter
- If you want to apply the filter to existing emails that meet the criteria, check the box labeled Also apply filter to matching conversations.
- Click Create filter.
Step 6: Managing Your Filters
To view, edit, or delete filters, follow these steps:
- Click the Settings gear icon in the top right corner.
- Select See all settings.
- Navigate to the Filters and Blocked Addresses tab.
- Here, you can see the list of existing filters and make changes as needed.
Conclusion
Gmail filters are an essential tool for organizing your inbox and automating repetitive tasks. By following these steps, you can create filters that help you stay organized and improve your productivity. Whether you’re managing work emails or sorting out newsletters, Gmail filters can make your email management much more efficient.
Here’s a pictorial guide on how to create a filter on Gmail
While managing your inbox may seem overwhelming, mastering the art of filtering emails in Gmail can greatly enhance your email management. This guide will teach you how to filter emails and minimize clutter.
Effortless Email Management with Gmail Filters
Gmail filters are powerful tools that help you automate your inbox management. With the right setup, you can automatically label, archive, delete, star, or forward emails based on specific conditions.
If you want to filter your inbox without creating complex rules, here are some simple options:
- The Gmail search bar
- Gmail Settings
- The Smart Folders feature in Clean Email
These methods allow you to filter emails with just one click.
For those who prefer more customized email filtering rules, keep reading for a step-by-step guide.
How to Set Up a Gmail Filter on Your Computer
You can create a filter in Gmail using three different methods:
Method 1: Via the Gmail Search Bar
- Locate the search bar at the top of your Gmail inbox.
- Click the filter icon at the far right of the search bar.

3. Enter a keyword, sender’s email address, or any other condition you’d like to filter in the pop-up window.
4. Next, click “Create filter” at the bottom of the window. A new window will appear, allowing you to select the actions you’d like to apply.
5. After selecting your desired actions, hit “Create filter” at the bottom of the window.
6. Your newly created filter will be accessible in Settings (see Method 2 for details).
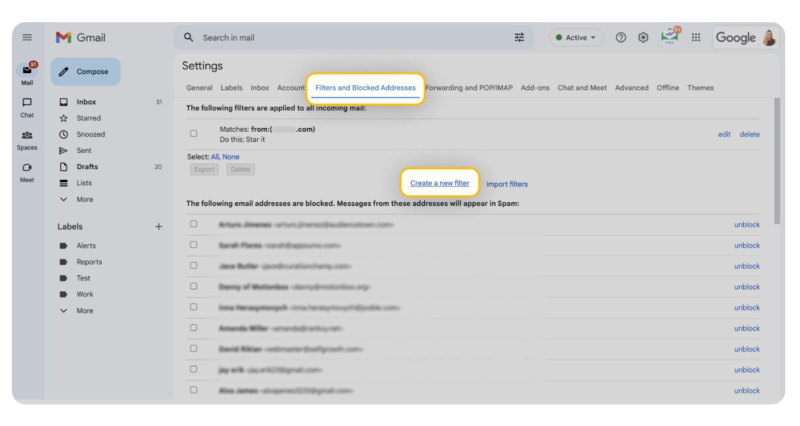
Method 2: Through Gmail Settings
- Click the gear icon in the top-right corner of Gmail.
- Select “See all settings” from the pop-up menu.
- Navigate to the Filters and Blocked Addresses tab.
- Click on “Create a new filter.”
5. In this window, enter the criteria for your filter, such as the sender’s email address or specific keywords. Then, click “Create filter.”
6. Specify the actions you’d like Gmail to take when an email matches these criteria.
7. Click “Create filter” again to finalize.
8. Your new filter, along with existing ones, can be found in the Filters and Blocked Addresses tab.
Method 3: Directly from an Email
- Open an email from the sender you want to filter.
- Click the three dots in the top-right corner of the email.
- Select “Filter messages like this” from the drop-down menu.
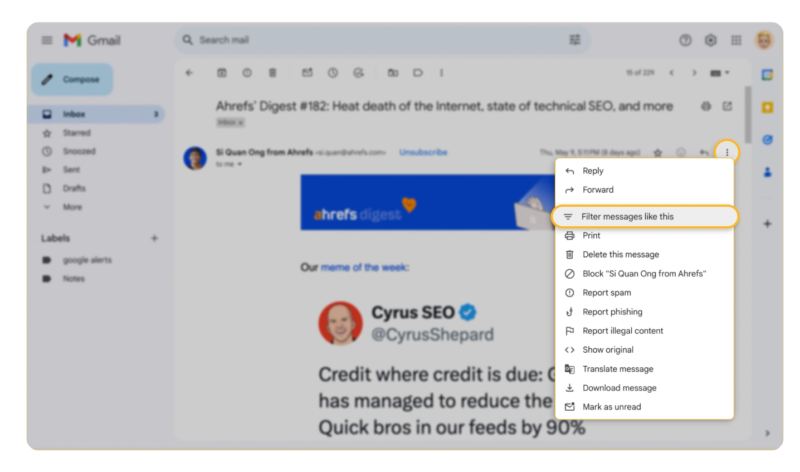
4. A new window will appear with the sender’s email address pre-filled as the filter condition.
5. You can include additional criteria by clicking “Create filter” and choosing your preferred actions.
How To Filter Messages From A Mailing List On Gmail (Video Guide)
Here’s a step by step guide to create a filter on Gmail to delete emails with ”unsubscribe” in them:
How To Create A Filter On Gmail To Delete Everything With The Word ”Unsubscribe” In It
Step 1: Log in to your Gmail account
Step 2: Click on the gear icon. In the upper right corner of the page, click on the gear icon.
Step 3: Select ”See all settings” From the drop down menu, select ”See all settings.”
Step 4: Go to the ”Filters and Blocked Addresses” tab
Click on the ”Filters and Blocked Addresses” tab.
Step 5: Click on ”Create a new filter” Click on the ”Create a new filter” button.
Step 6: Enter the filter criteria
In the ”Has the words” field, enter:
unsubscribe OR ”opt out” OR ”remove me”
This will filter emails containing the words ”unsubscribe”, ”opt out”, or ”remove me”
Step 7: Select the filter action
Select the ”Delete it” option.
Step 8: Click on ”Also apply filter to matching conversations”
Check the box next to ”Also apply filter to matching conversations” to apply the filter to existing emails.
Step 9: Click on ”Create filter” Click on the ”Create filter” button.
How to Create Rules in Gmail to Manage Your Inbox Effectively
Gmail offers a powerful feature known as filters that allow users to create rules for managing their inbox efficiently. By setting up these rules, you can automatically sort, label, archive, or delete emails based on specific criteria. Here’s a step-by-step guide to help you create rules in Gmail.
Method 1: Using the Gmail Search Bar
- Open Gmail: Sign in to your Gmail account.
- Access the Search Bar: Locate the search bar at the top of your inbox.
- Click on the Filter Icon: At the end of the search bar, click the filter icon.
- Set Your Criteria: Enter your desired conditions, such as a sender’s email address, subject line, or keywords.
- Create the Filter: Click on Create filter at the bottom right of the window.
- Choose Actions: Select what actions Gmail should take, such as applying a label, marking as read, archiving, or deleting the email.
- Confirm: Click Create filter to save your rule.
Method 2: Through Gmail Settings
- Access Gmail Settings: Click the gear icon in the top right corner and select See all settings.
- Navigate to Filters and Blocked Addresses: Click on the Filters and Blocked Addresses tab.
- Create a New Filter: Scroll down and click on Create a new filter.
- Input Filter Criteria: Enter the criteria, such as the sender’s email, subject line, or keywords.
- Choose Actions: Define the actions to be applied when an email meets the criteria.
- Save the Filter: Click Create filter to finalize.
Method 3: From an Existing Email
- Open an Email: Find and open an email from the sender you want to filter.
- Access the More Options Menu: Click the three dots in the top right corner.
- Filter Messages Like This: Select Filter messages like this from the dropdown.
- Set Additional Criteria (Optional): Add any additional conditions.
- Choose Actions: Decide how Gmail should handle the emails.
- Create the Filter: Click Create filter to complete the process.
Managing Your Filters
To view, edit, or delete your filters:
- Go to Settings > See all settings > Filters and Blocked Addresses.
- Review your existing filters.
- Click Edit to modify the filter or Delete to remove it.
Conclusion
By creating rules in Gmail, you can streamline your email management, reduce clutter, and improve productivity. Whether you want to automatically sort emails, label important messages, or block unwanted senders, Gmail filters provide a flexible and efficient solution.